Articles
Fetch CS2 Inventory with Floats using CSInventoryAPI (NodeJS)
Fetch CS2 inventory floats with CSInventoryAPI’s v2 inspect endpoint in NodeJS, including the %propid:6% inspect-link mapping.

Update September 17th, 2026: Valve changed inspect links back in March (the old S/A/D format is gone). CSInventoryAPI now has a v2 inspect endpoint that works with the new links, so this guide is current again.
In an attempt to make CSInventoryAPI more accessible, I figured I would put together a quick article detailing how to successfully use our most popular endpoint, the inspect API (/api/v2/items/inspect).
The ?url= property
The only thing we need to obtain the advanced item info for a specific item is the inspect url, most easily found by navigating to your own inventory, clicking an item, and finding the "Inspect in Game..." button.
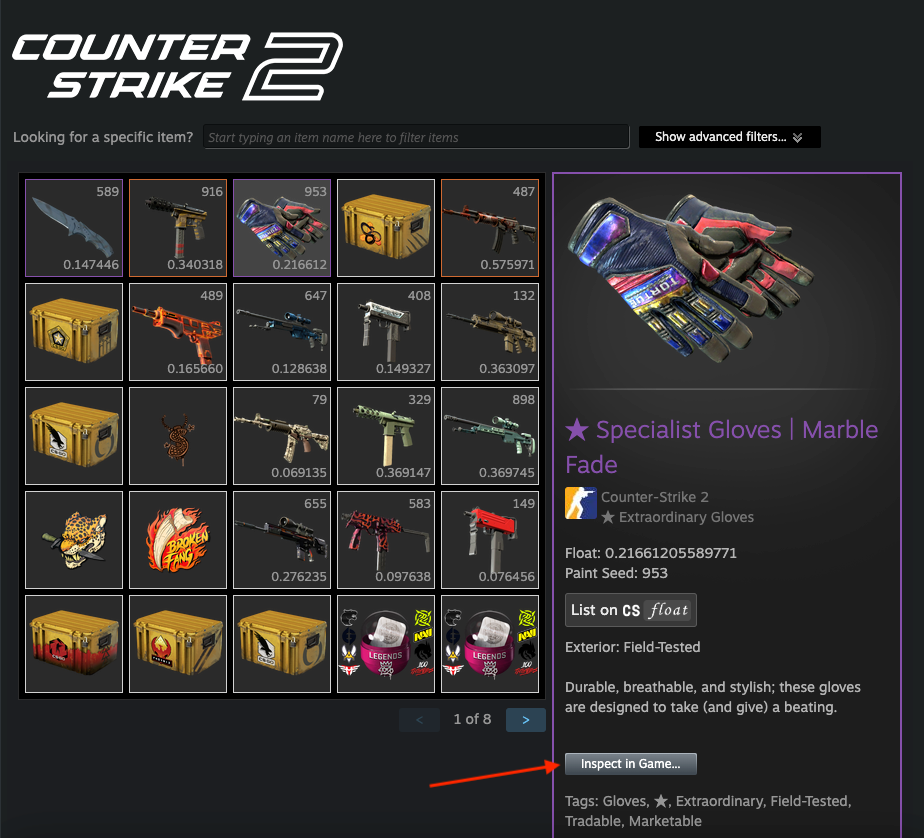
If you copy that link address, you will find something with a close resemblance to:
steam://run/730//+csgo_econ_action_preview%203E2E92FFA1FA71263A1E3D163D0E3A06F7D3A4D13D7EF53C5C3B363E2EEF345C3B363F2EEF345C3B363C2EEF345C3B363D2EEF3456384E266F9627B2
Now, the most important part of this url is what happens near the end, after the %20 (space).
That long hex string is the inspect payload Valve started shipping in March 2026. We will not have to worry about decoding it ourselves — that is what the inspect endpoint is for.
Testing the inspect endpoint
Armed with this inspect link, you can try out the endpoint using the swagger UI available at https://csinventoryapi.com/docs.
Add your API key and the url, then press execute.
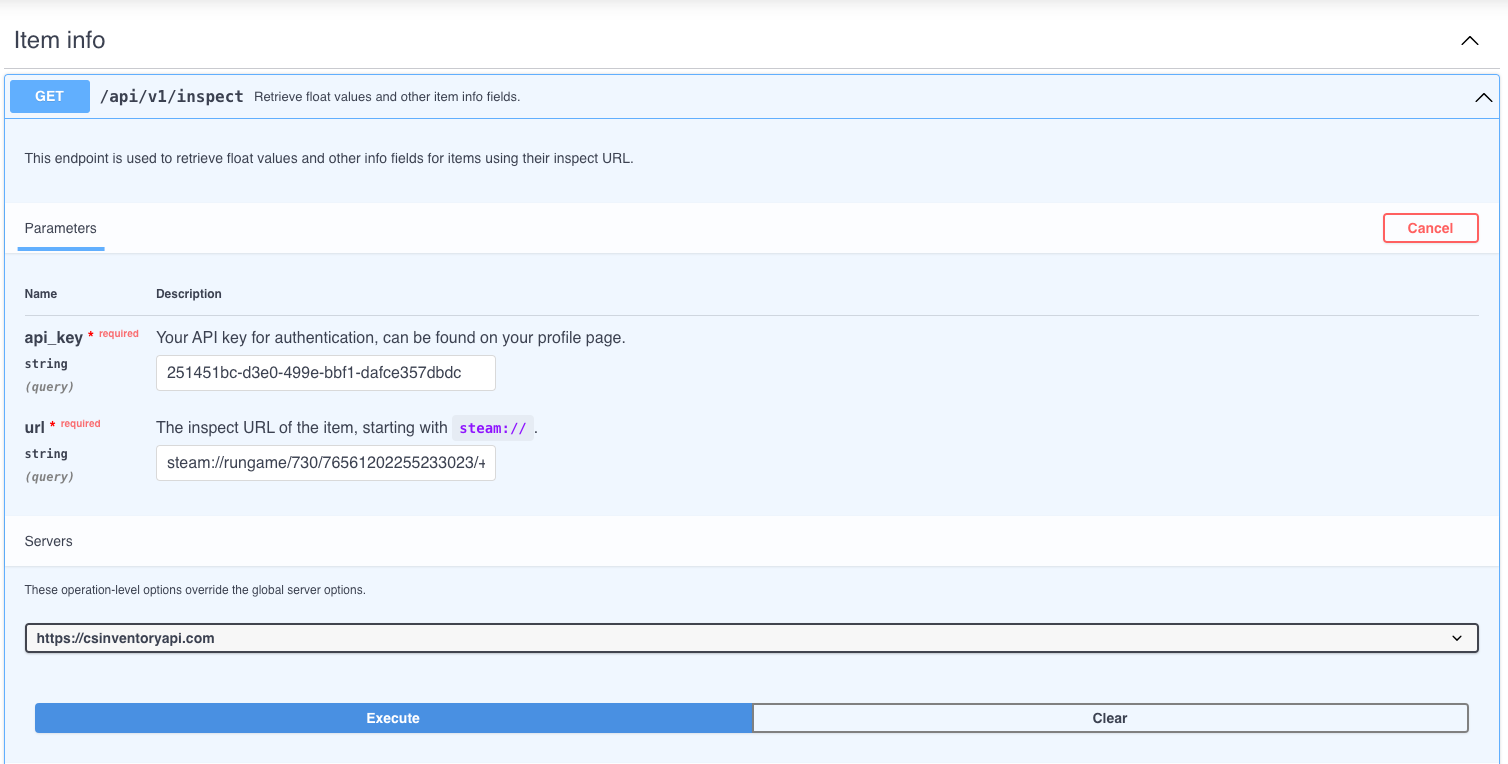
If all works well, you should receive an output similar to this:
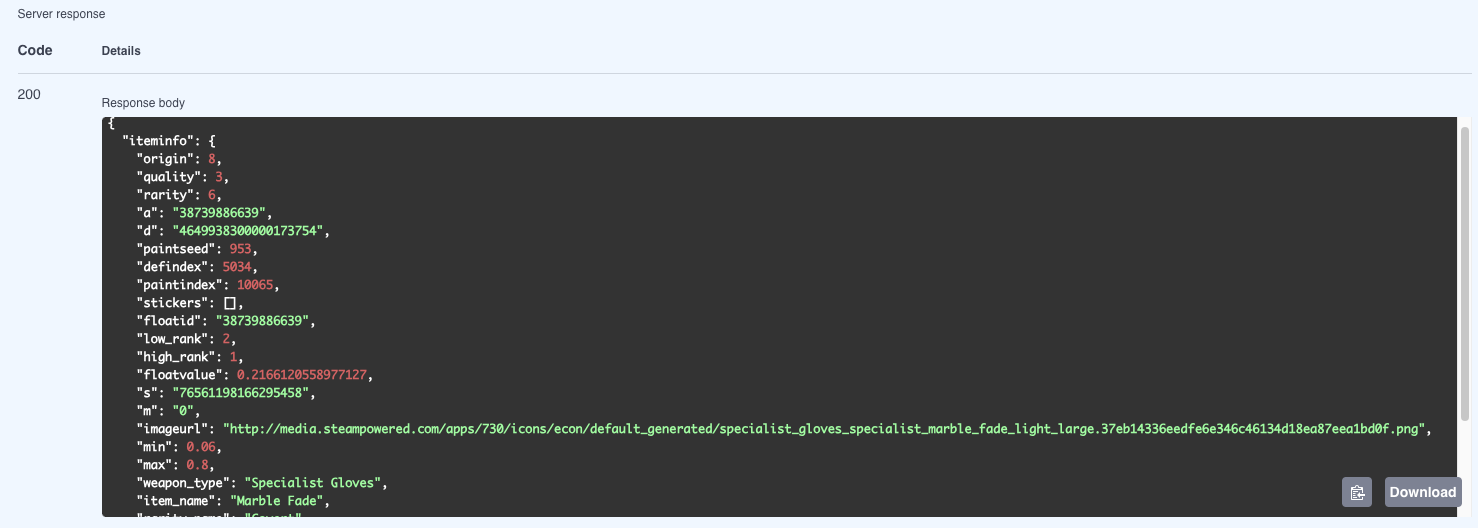
"float_value" is the property that shows the float of the item in question.
Fetching floats of items in an inventory using NodeJS
The crux of it is, when fetching an inventory (e.g., by using the https://csinventoryapi.com/api/v1/inventory endpoint), the inspect url does not come pre-populated with the fields required to inspect the item, specifically the hex payload is replaced with a %propid:6% placeholder.
The solution to this is however relatively straightforward. Steam now also returns asset_properties alongside assets and descriptions. The placeholder is filled from the property where propertyid is 6 (string_value). Let us see how to do this in practice (all code will be available on GitHub):
Get user inventory
Firstly, we'll build a method to retrieve a user's inventory (also using CSInventoryAPI to avoid rate limits imposed by Steam):
import axios from 'axios';

const API_KEY = process.env.CSINVENTORYAPI_API_KEY;

if (!API_KEY) {
    throw new Error('No API key provided');
}

/**
 * Fetches the inventory of a user
 *
 * @param {string} steamid64 of the user
 * @returns {Promise<Inventory>} the user's inventory
 */
const getUserInventory = async (steamid64) => {
    const response = await axios.get(
        `https://csinventoryapi.com/api/v1/inventory?api_key=${API_KEY}&steamid64=${steamid64}`
    );

    if (response.data.success !== 1) {
        throw new Error('Failed to fetch inventory');
    }

    if (response.data.total_inventory_count === 0) {
        throw new Error('No items found.');
    }

    if (!response.data.assets || !response.data.descriptions) {
        throw new Error('No assets found.');
    }

    return response.data;
}
Simple method to fetch user inventory w/ some error handling.
Parse user inventory
Armed with this data, and given that the user have items in their inventory, we can go ahead and parse it into a more manageable array of items (Steam divides the assets and the descriptions, why this is a necessary step in most applications utilising inventory fetching). Steam also returns asset_properties as a separate array, keyed by assetid.
/**
 *
 * @param {Inventory} inventory
 * @returns {Promise<ParsedInventoryItem[]>}
 */
const parseInventory = async (inventory) => {
    const parsedInventory = [];

    for (let i = 0; i < inventory.assets.length; i++) {
        const asset = inventory.assets[i];
        const description = inventory.descriptions.find(d => d.classid === asset.classid);
        const assetPropertiesEntry = (inventory.asset_properties || []).find(
            (entry) => entry.assetid === asset.assetid
        );

        if (!description) {
            continue;
        }

        parsedInventory.push({
            appid: asset.appid,
            classid: asset.classid,
            instanceid: asset.instanceid,
            assetid: asset.assetid,
            contextid: asset.contextid,
            icon_url: description.icon_url,
            tradable: description.tradable,
            inspect_url: description.actions && description.actions[0] && description.actions[0].link || null,
            asset_properties: assetPropertiesEntry && assetPropertiesEntry.asset_properties || [],
            name: description.name,
            market_hash_name: description.market_hash_name,
            name_color: description.name_color
        });
    }

    return parsedInventory;
}
Some parsing is required to find the fields we are interested in (specifically the inspect_url, which might not always be present. A sticker capsule, for instance, does not have an inspect url).
If we now test running these methods using the following code:
const inventory = await getUserInventory(steamid64);
const parsedInventory = await parseInventory(inventory);
console.log(parsedInventory);
We will see an array of items that look like this:
{
    appid: 730,
    classid: '241585251',
    instanceid: '6276485436',
    assetid: '21349523628',
    contextid: '2',
    icon_url: 'i0CoZ81Ui0m-9KwlBY1L_18myuGuq1wfhWSaZgMttyVfPaERSR0Wqmu7LAocGIGz3UqlXOLrxM-vMGmW8VNxu5Dx60noTyL2kpnj9h1I4M28baBSLPmUBnPelb93teA-FivjzB5wsjzTyI2pIn_CPAMoW8N3ROJZshm5w9zgNbnk5xue1dyMA9ZU_Q',
    tradable: 1,
    inspect_url: 'steam://run/730//+csgo_econ_action_preview%20%propid:6%',
    asset_properties: [
        { propertyid: 1, int_value: 331 },
        { propertyid: 2, float_value: 0.11265332251787186 },
        { propertyid: 6, string_value: '3E2E92FFA1FA71263A1E3D163D0E3A06F7D3A4D13D7EF53C5C3B363E2EEF345C3B363F2EEF345C3B363C2EEF345C3B363D2EEF3456384E266F9627B2' }
    ],
    name: 'Glock-18 | Candy Apple',
    market_hash_name: 'Glock-18 | Candy Apple (Minimal Wear)',
    name_color: '4b69ff'
}
If we look at the inspect url, we can see that we are missing the hex payload that I mentioned earlier, and that it is filled with a %propid:6% placeholder. On a positive note, at least it tells us precisely what should be put in its place.
You'll also notice propertyid 1 and 2 on asset_properties (paint seed and wear). Those are handy, but we're still going to inspect the item — that's where you get stickers and the rest of the payload.
Populating the %propid:6% field
The last step is to populate the field in the item's inspect url, and actually fetch the floatvalue for each item in the parsed inventory.
/**
 * Populates the float values of the items in the inventory
 * @param {ParsedInventoryItem[]} parsedInventory
 * @returns {Promise<ParsedInventoryItem[]>}
 */
const addFloatsToParsedInventory = async (parsedInventory) => {
    const parsedInventoryWithFloats = [];

    for (const item of parsedInventory) {
        try {
            if (!item.inspect_url) {
                console.error('No inspect url found for item:', item.market_hash_name);
                continue;
            }

            const itemCertProp = (item.asset_properties || []).find(
                (prop) => prop.propertyid === 6
            );

            if (!itemCertProp || !itemCertProp.string_value) {
                console.error('No inspect payload found for item:', item.market_hash_name);
                continue;
            }

            const parsedInspectUrl = item.inspect_url.replace(
                '%propid:6%',
                itemCertProp.string_value
            );

            if (parsedInspectUrl.includes('%propid:6%')) {
                console.error('Failed to populate inspect url for item:', item.market_hash_name);
                continue;
            }

            const params = new URLSearchParams();
            params.append('url', parsedInspectUrl);
            params.append('api_key', API_KEY);

            const response = await axios.get(
                'https://csinventoryapi.com/api/v2/items/inspect?' + params.toString()
            );

            const {
              float_value,
              paintseed,
              paintindex
            } = response.data;

            parsedInventoryWithFloats.push({
                ...item,
                inspect_url: parsedInspectUrl,
                float_value,
                paintseed,
                paintindex
            });

            await new Promise(r => setTimeout(r, 1000));
            console.log('Fetched float values for item:', item.market_hash_name);
        } catch (error) {
            console.log(error);
            console.error('Failed to fetch float values for item:', item.market_hash_name);
        }
    }

    return parsedInventoryWithFloats;
}
First we replace the missing field in the inspect_url, then we fetch the floatvalue using the API endpoint.
If we run this and print the inventory afterwards, we'll see floatvalues for the items that have that property, e.g.:
{
    appid: 730,
    classid: '7993037444',
    instanceid: '6276307690',
    assetid: '20365163926',
    contextid: '2',
    icon_url: 'i0CoZ81Ui0m-9KwlBY1L_18myuGuq1wfhWSaZgMttyVfPaERSR0Wqmu7LAocGIGz3UqlXOLrxM-vMGmW8VNxu5Dx60noTyLkjYbf7itX6vytbbZSI-WsG3SA_u1vouRxcCS2kRQyvnPdmN-tJXmXbAJyApIlF7JcsRO6xNDnZLvisQzd3d1Fmyyr3Cwf6io6_a9cBmchrxE-',
    tradable: 1,
    inspect_url: 'steam://run/730//+csgo_econ_action_preview%203121A7CADFDF7A290C11CC35193501350988E4DEC23271065334393121E62E5334393021E62E5334393321E62E5334393221E62E59634139F829BB51',
    name: 'USP-S | Cyrex',
    market_hash_name: 'USP-S | Cyrex (Field-Tested)',
    name_color: '8847ff',
    float_value: 0.2460125833749771,
    paintseed: 55,
    paintindex: 637
}
A note on rate limits
The timeout in the loop is to make sure that you do not hit the rate limit imposed by CSInventoryAPI. /api/v2/items/inspect only costs 1 request point (the old v1 inspect was 25), so the timeout duration can be adjusted depending on your plan.
If you have any questions, want further help with implementation, or want to start a new project, feel free to get in touch.